UE plugin
Flowbit Unreal Windows Usage Guide
Introduction
The Determ Voxel UE Plugin is a powerful tool that enables real-time point cloud streaming and management within Unreal Engine. This plugin provides two main example scenes that demonstrate different aspects of its functionality:
Direct Streaming Example: A straightforward implementation for streaming point cloud data directly from a client device.
Manager-Enabled Example: A more comprehensive demonstration featuring device management, streaming control, and video recording capabilities.
This guide will walk you through both examples, providing step-by-step instructions for:
Setting up and configuring the streaming environment
Managing client connections
Controlling point cloud streaming
Recording and playing back video content
Navigating the point cloud view
Whether you're looking to implement basic streaming or need advanced management features, this documentation will help you get started with the Determ Voxel UE Plugin.
Example Scenes Guide
This document provides instructions on how to run the example scenes included with the Determ Voxel UE Plugin. Follow the steps below to explore the various functionalities and features of the plugin through the provided example scenes.
Direct streaming
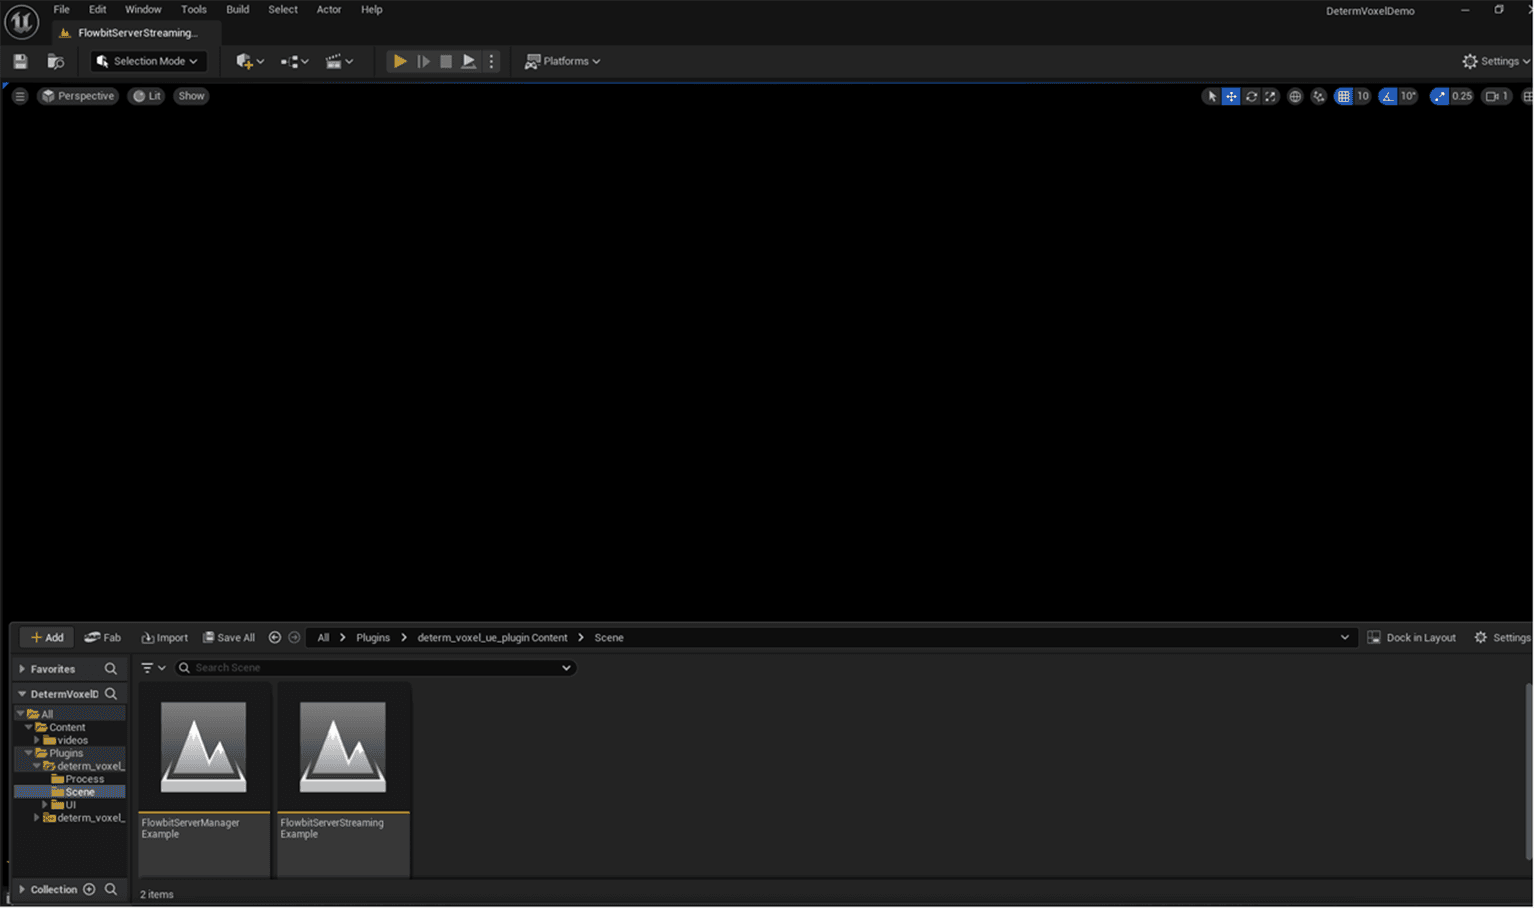
Navigate to the determ_voxel_ue_plugin directory within your Unreal Engine project.
Open the Scene folder.
Locate the FlowbitServerStreamingExample scene file.
Double-click on FlowbitServerStreamingExample to open it in the Unreal Engine editor
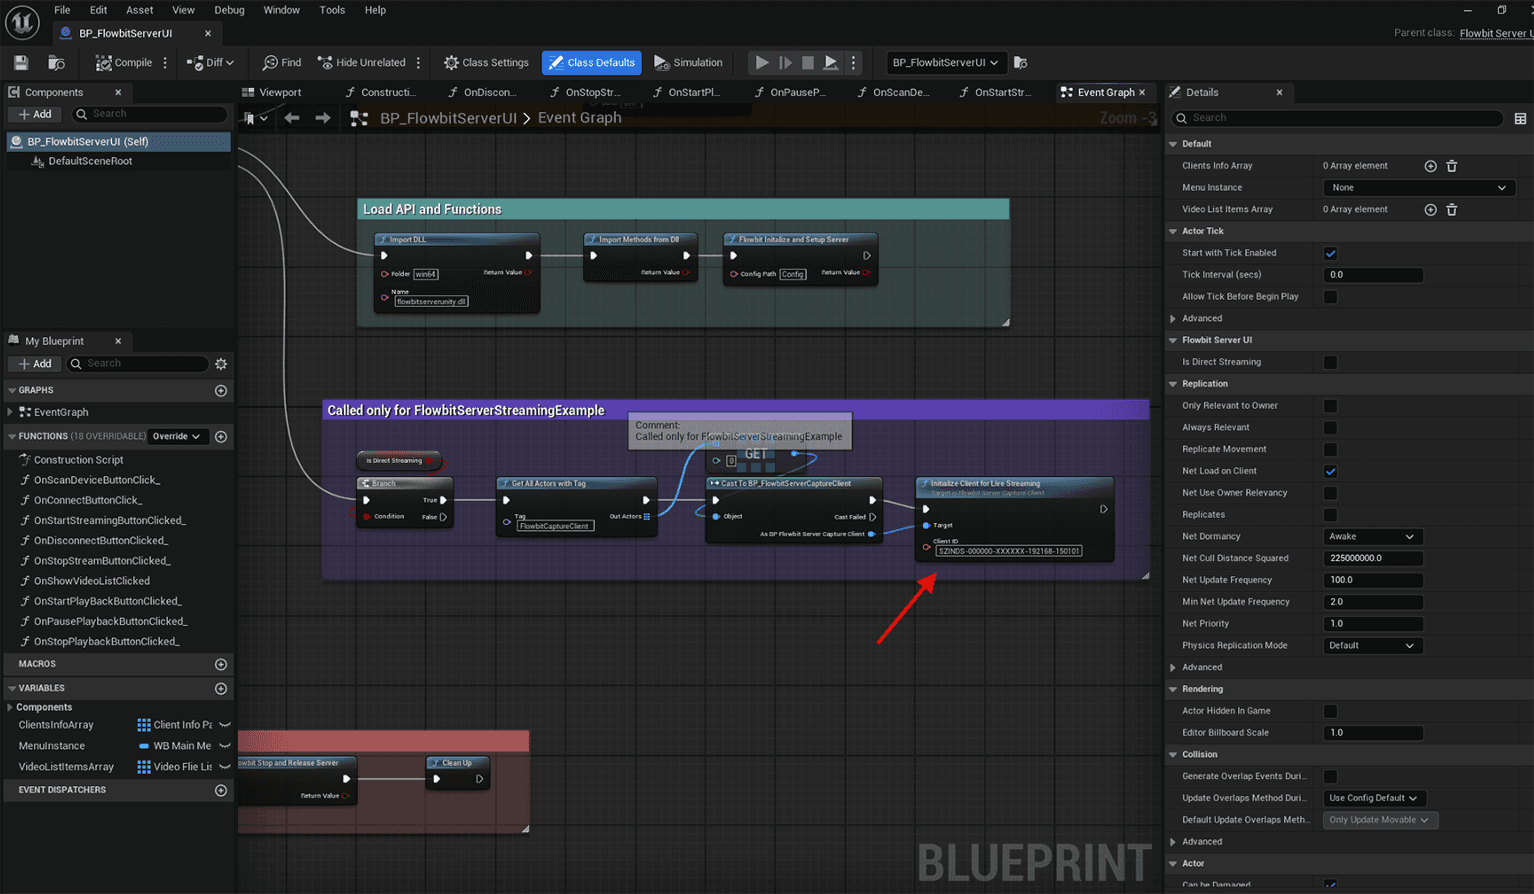
In the Outliner, locate the BP_FlowbitServerUI blueprint
The Outliner is typically found on the right side of the Unreal Engine editor.
Scroll through the list of actors in the Outliner until you find BP_FlowbitServerUI.
Right-click on BP_FlowbitServerUI to open the context menu.
From the context menu, select Edit Blueprint to open the blueprint editor for BP_FlowbitServerUI.
Alternatively, you can double-click on BP_FlowbitServerUI to directly open it in the blueprint editor.

Once the blueprint editor has opened, locate the blueprint function named Initialize Client for Live Streaming. This function is responsible for setting up the client for live streaming. You can find it in the Functions list on the left side of the blueprint editor
Click on the Initialize Client for Live Streaming function to open its details.
In the function's details panel, you will see a field labeled Client ID.
Enter the ID of the client you want to stream from in the Client ID field. This ID should be unique to the client device you are connecting to. For example, you might use an ID like SZINDS-000000-XXXXXX-192168-150101.
Ensure that the Client ID you enter matches the ID of the client device you intend to use for streaming. This is crucial for establishing a successful connection
The screenshot below shows the Initialize Client for Live Streaming function with an example Client ID entered:
Verify and Rename the Configuration Folder, then Update Device IP
Navigate to the determ_voxel_ue_plugin/Config directory within your Unreal Engine project.
Locate the folder that corresponds to the Client Device ID you entered in the Initialize Client for Live Streaming function. If the folder name does not match the Client Device ID, rename it to match. For example, if your Client Device ID is SZINDS-000000-XXXXXX-192168-150101, ensure the folder is named accordingly. Your actual folder name will vary based on your specific Client Device ID.
Open the renamed folder. Inside this folder, find the capture_config file. Open the capture_config file using a text editor of your choice.
In the capture_config file, locate the field labeled Device IP.
Modify the Device IP field to match the IP address of the client device you intend to connect to. This IP address should correspond to the client device's network address.
Save the changes to the capture_config file and close the text editor
Ensure the client device is powered on, connected to the network, and ready for live streaming.
Verify that the client device is properly powered on and operational.
Check that the client device is connected to the same network as the server.
Confirm that the client device is configured and ready for live streaming. Make sure any necessary software or drivers required for the client device are installed and running.
Ensure that the client device's network settings are correctly configured to allow communication with the server
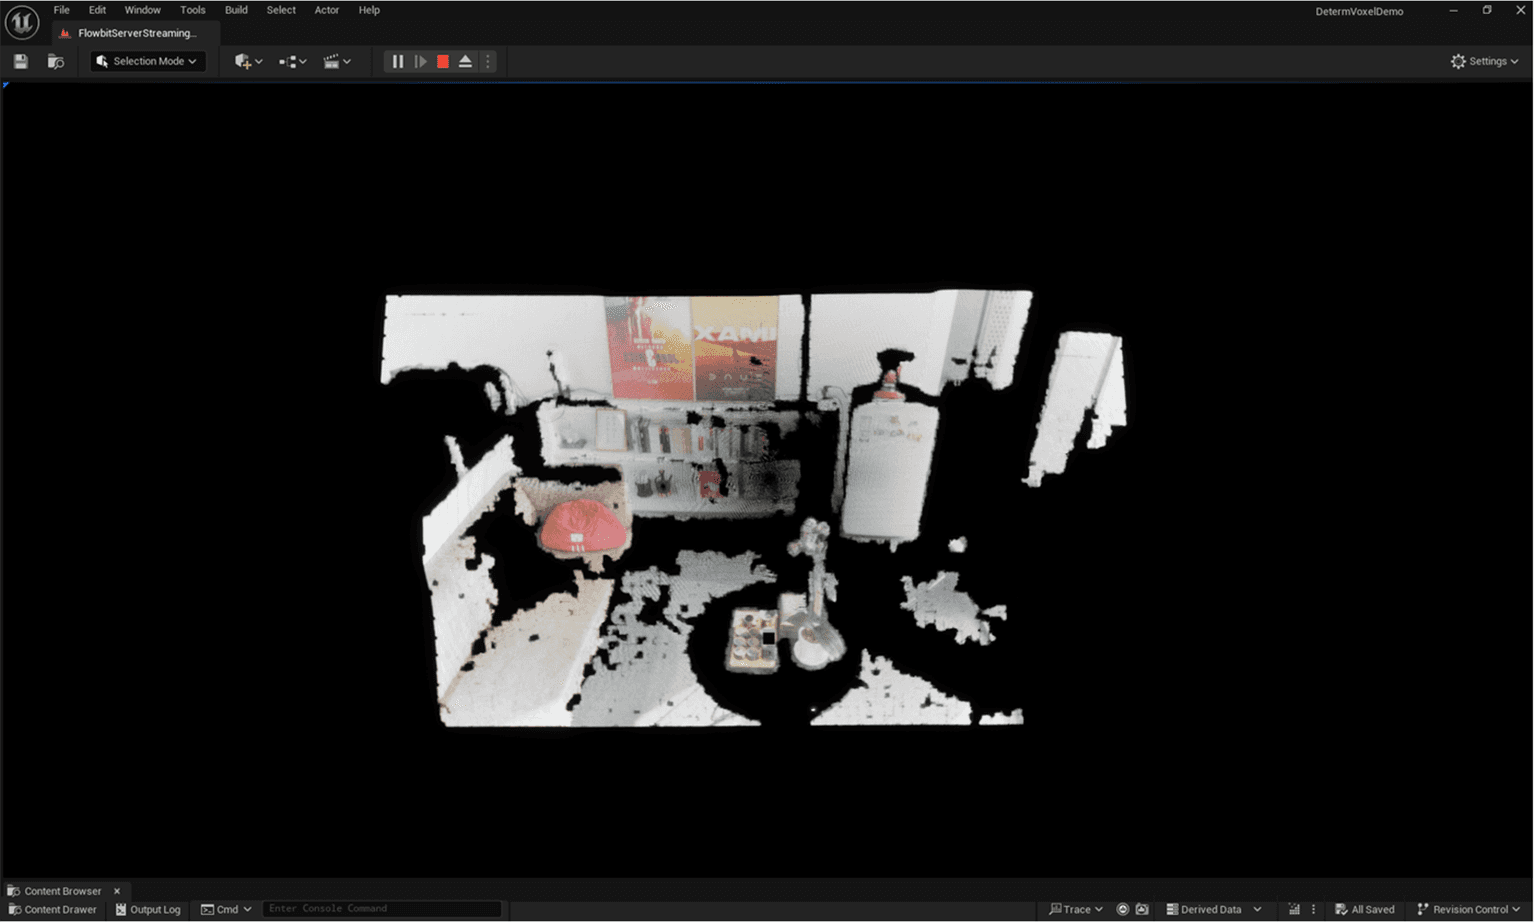
Once all the above steps are completed, press Play in the Unreal Engine editor to watch the point cloud in the editor.
Fully functional example with manager enabled
Navigate to determ_voxel_ue_plugin and open FlowbitServerManagerExample in the Scene folder
Open your Unreal Engine project.
In the Content Browser, navigate to the Plugins folder.
Inside the Plugins folder, locate and open the determ_voxel_ue_plugin directory.
Within the determ_voxel_ue_plugin directory, find the Scene folder.
In the Scene folder, locate the FlowbitServerManagerExample file.
Double-click on FlowbitServerManagerExample to open it in the Unreal Engine editor.
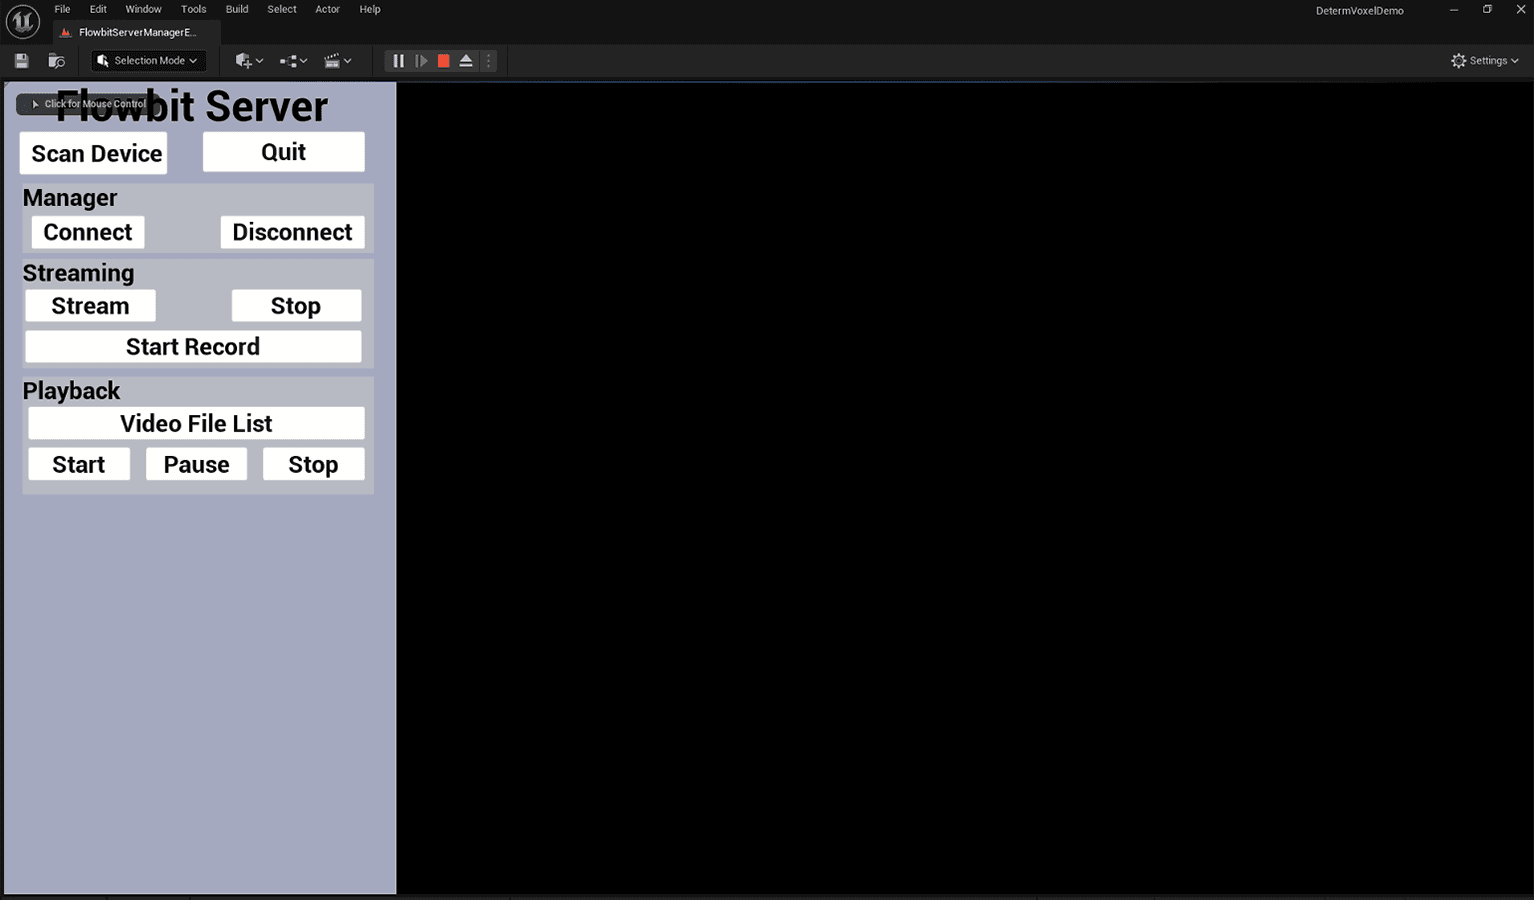
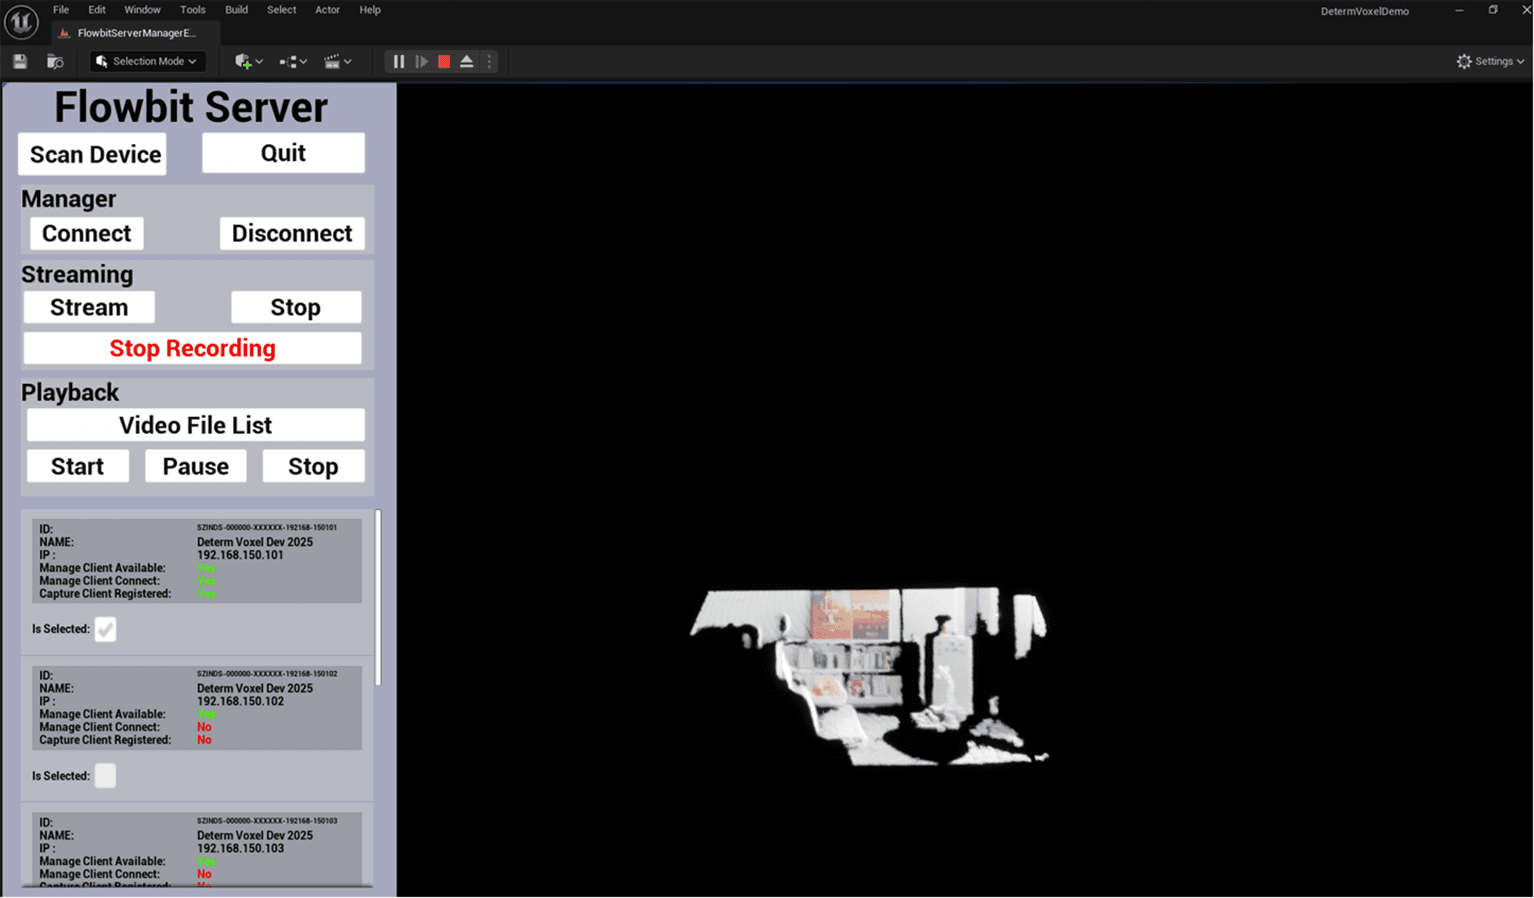
The FlowbitServerManagerExample scene will load, displaying the example setup for managing Flowbit server connections and client interactions
Press play to run the example
In the Unreal Engine editor, locate the toolbar at the top of the screen.
Click on the Play button in the toolbar to start the simulation. This will initiate the example scene and allow you to interact with it.
The FlowbitServerManagerExample scene will load, displaying the example setup for managing Flowbit server connections and client interactions.
Observe the scene to ensure that all elements are loaded correctly and that there are no errors or issues.
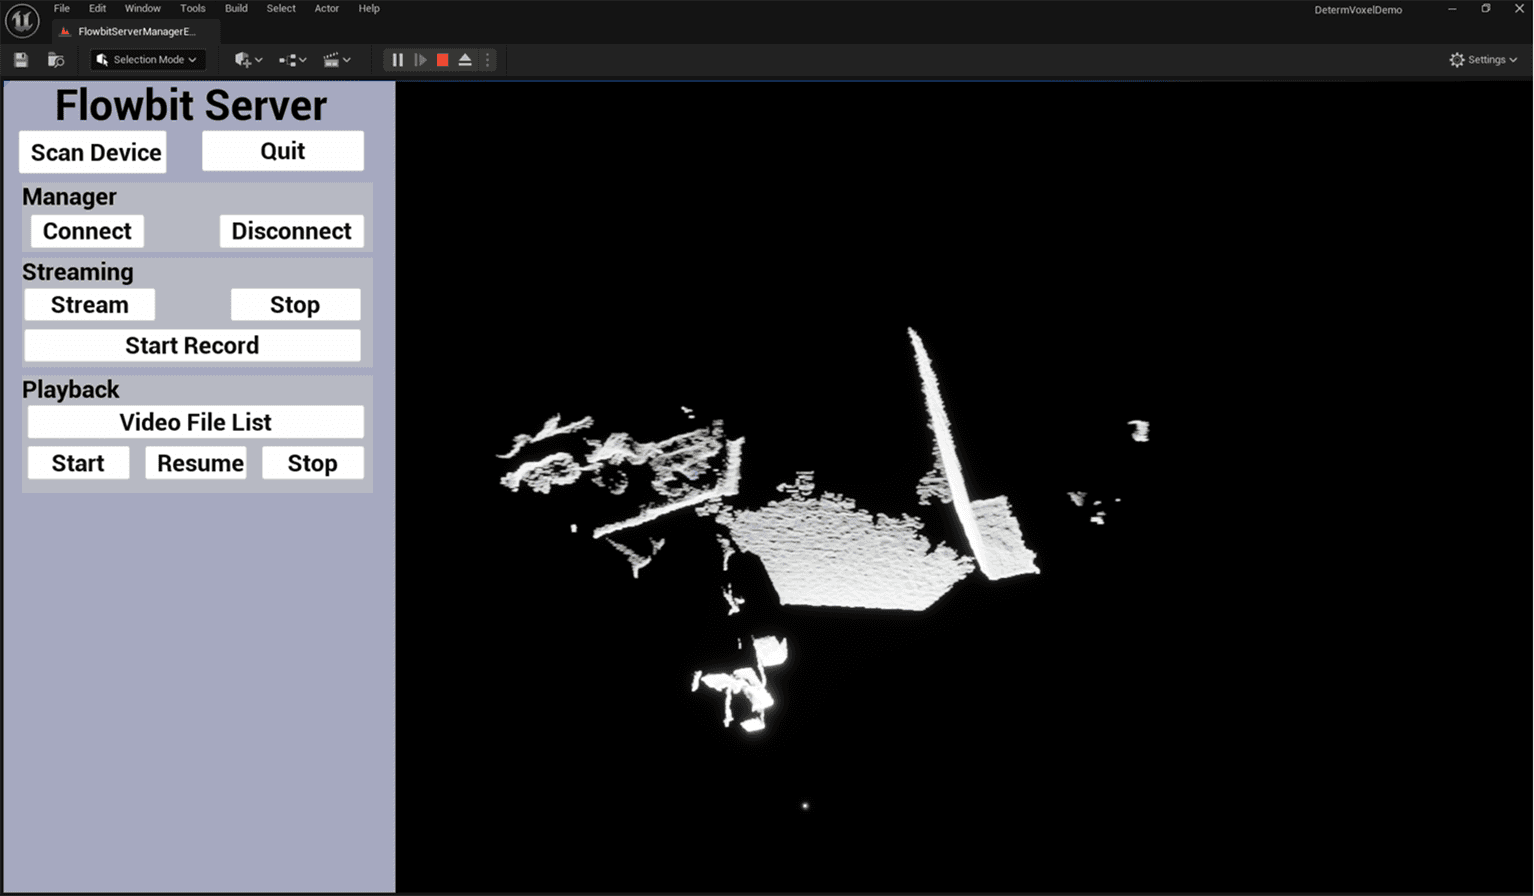
You should see the example environment with various UI elements and controls for managing the Flowbit server and client devices
The screenshot below shows the FlowbitServerManagerExample scene running in the Unreal Engine editor:
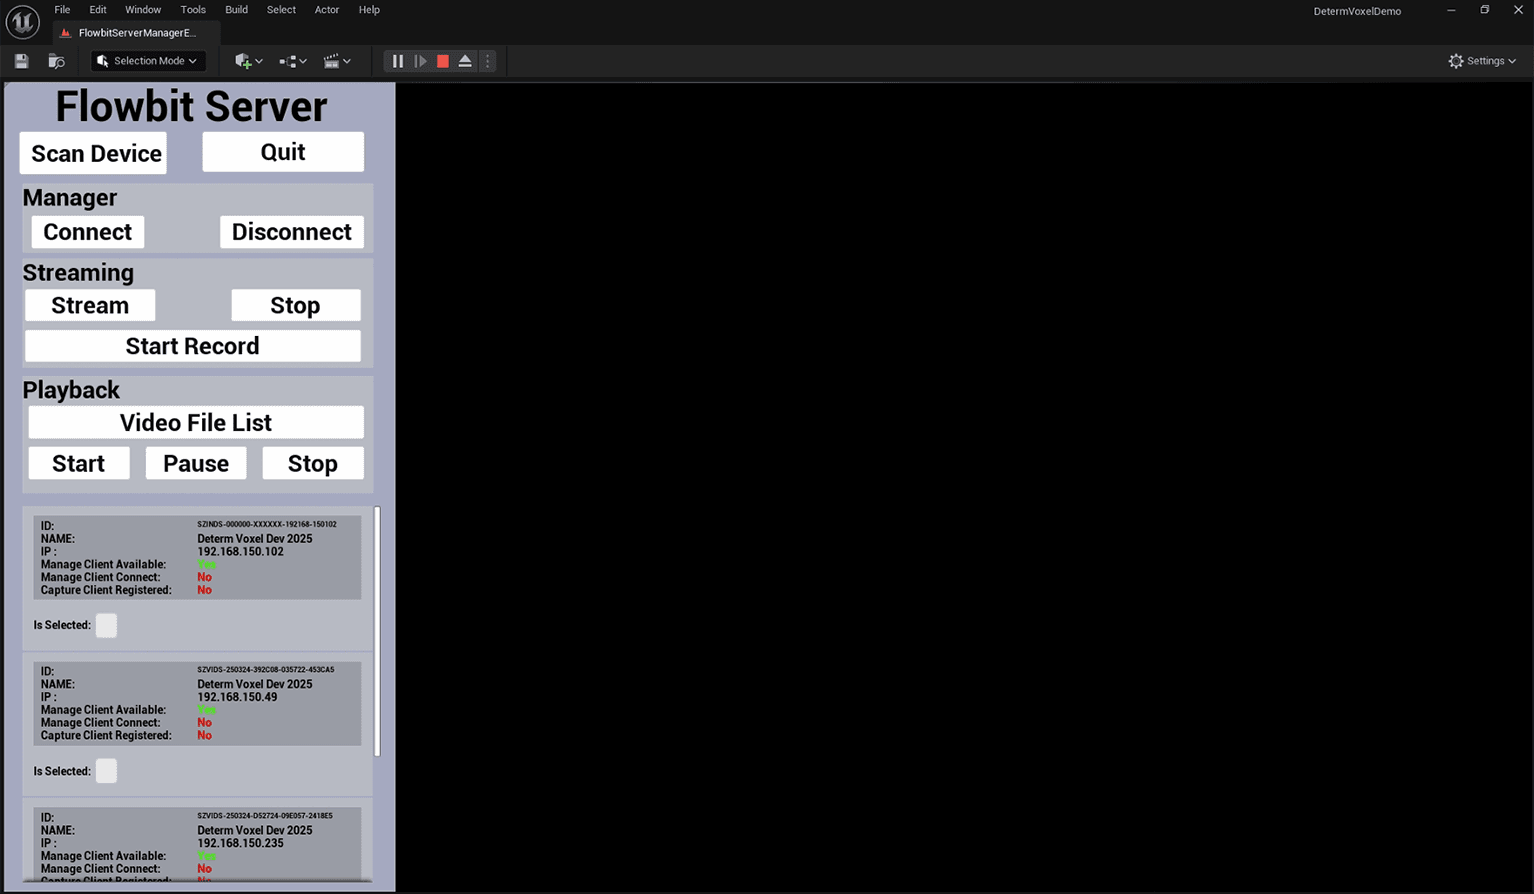
Scan for Available Devices
In the FlowbitServerManagerExample scene, locate the Scan Device button in the UI.
Press the Scan Device button to initiate a scan for available client devices on the local network.
The system will search for client devices that are connected to the same network as the server.
Once the scan is complete, the discovered client devices will be listed in the UI.
The client information will be displayed in a scrollable section, showing details such as Client ID, Client Name, Client IP, and the status of the management and capture clients.
Review the list to see the available client devices and their respective information
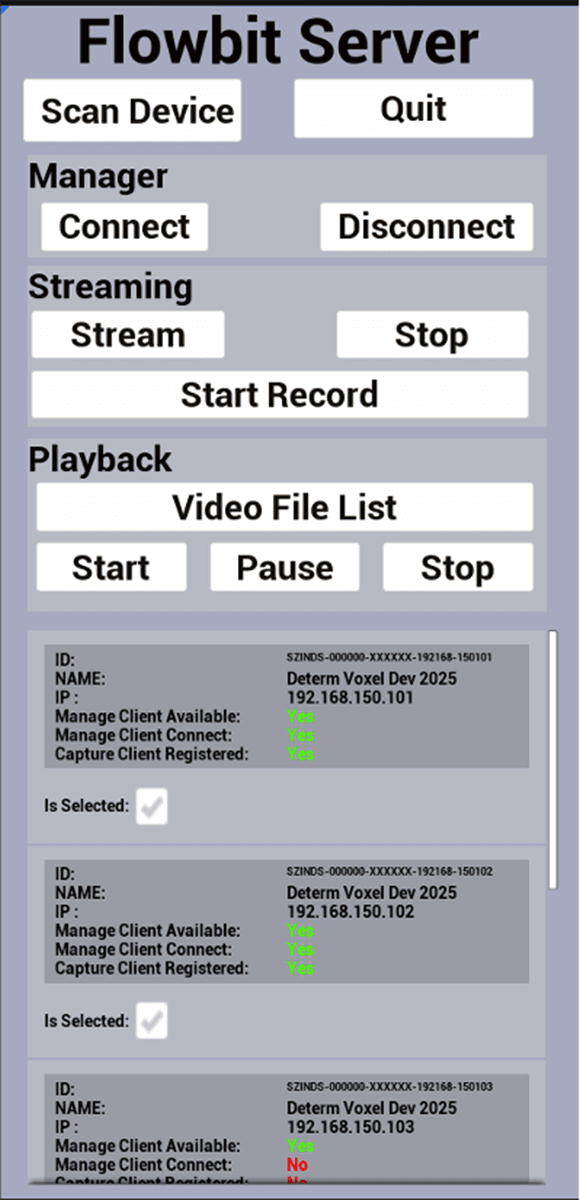
Connect and Disconnect Clients
In the FlowbitServerManagerExample scene, locate the Connect and Disconnect buttons in the UI.
These buttons allow you to connect or disconnect the server from the client devices.
Note that only the clients with the Is Selected toggle turned on in the Client Info panel will be controlled by these buttons.
To connect the server to the selected clients, press the Connect button.
When the connection is successful, the Manage Client Connect message on the Client Info panel will change to Yes.
For example, if there are two clients with the Is Selected toggle turned on, only these two clients will be connected after pressing the Connect button.
To disconnect the server from the selected clients, press the Disconnect button.
When the disconnection is successful, the Manage Client Connect message on the Client Info panel will change to No.
The screenshot below shows the FlowbitServerManagerExample scene with the Connect and Disconnect buttons, and the Client Info panel displaying the connection status:
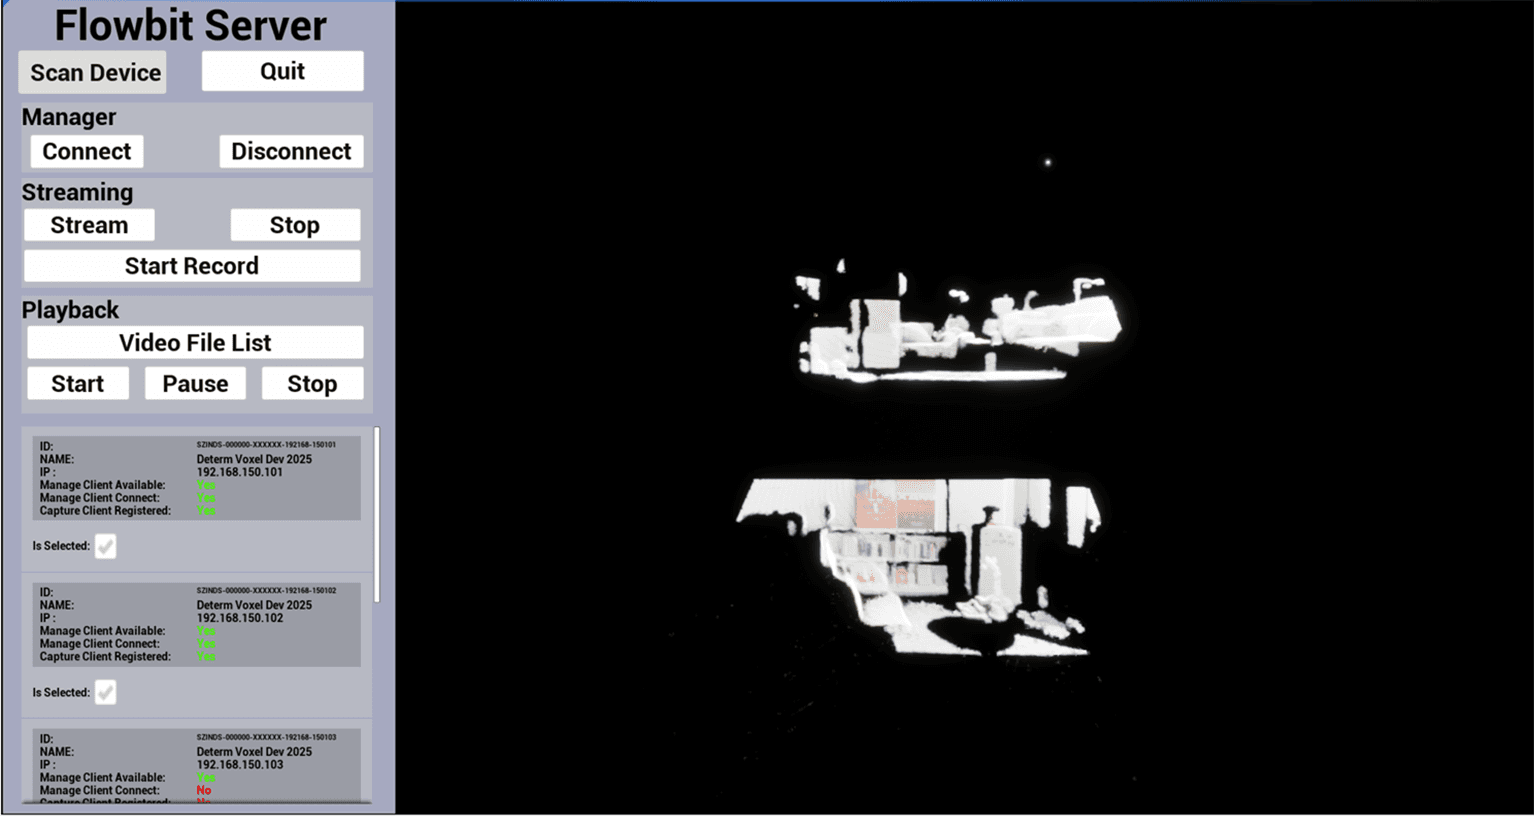
Start and Stop Point Cloud Streaming
In the FlowbitServerManagerExample scene, locate the Streaming panel in the UI.
The Streaming panel contains two buttons: Stream and Stop.
These buttons allow you to start or stop the point cloud streaming after the server has successfully connected to the clients.
To start the point cloud streaming, press the Stream button.
When the Stream button is pressed, the Capture Client Registered message on the Client Info panel will change to Yes.
This indicates that the capture client is registered and ready to stream the point cloud data.
The point cloud data will then be streamed and rendered in the main window of the Unreal Engine editor.
To stop the point cloud streaming, press the Stop button.
When the Stop button is pressed, the streaming will cease, and the point cloud data will no longer be rendered in the window.
The Capture Client Registered message on the Client Info panel will revert to No, indicating that the capture client is no longer registered for streaming.
The screenshot below shows the Streaming panel with the Stream and Stop buttons, and the Client Info panel displaying the registration status:
6. Navigating the Point Cloud View
When the point cloud is streaming and rendering in the window, you can navigate the viewpoint using the following controls:
W Key: Move the viewpoint forward.
A Key: Move the viewpoint to the left.
S Key: Move the viewpoint backward.
D Key: Move the viewpoint to the right.
To rotate the viewpoint, click and hold the right mouse button while moving the mouse. This allows you to look around and change the direction of the viewpoint.
These controls provide a first-person navigation experience, enabling you to explore the point cloud data from different angles and perspectives.
Make sure to use these controls to thoroughly inspect the streamed point cloud data and ensure it meets your requirements
Start and Stop Video Recording
When the point cloud is streaming and rendering in the window, you can initiate video recording by pressing the Start Record button.
The recording location depends on the state of the In Server toggle:
If the In Server toggle is on, the video will be recorded on the server side.
If the In Server toggle is off, the video will be recorded on the client side.
Once you press the Start Record button, it will change to Stop Record.
To stop the video recording, press the Stop Record button.
The recorded video will be saved automatically to the designated location based on the In Server toggle state.
Stopping the Video Recording
When you press the Stop Record button, the system will stop recording the video.
The point cloud streaming will continue uninterrupted, allowing you to keep viewing the live data.
The recorded video will be saved automatically to the designated location based on the In Server toggle state.
You can verify the successful stop of the recording by checking the Client Info panel, where the recording status will be updated.
The Stop Record button will revert to Start Record, indicating that you can initiate a new recording session if needed.
This functionality ensures that you can capture multiple video segments without stopping the point cloud stream.
Viewing and Selecting Recorded Videos
To view the list of recorded videos, press the Video File List button located in the UI.
Upon pressing the button, a list of all recorded videos will be displayed along with their respective recording times.
This list allows you to easily identify and select the video you wish to playback.
Each video entry in the list includes the recording start time, duration, and a brief description if available.
To select a video for playback, simply click on the desired video entry from the list.
Once a video is selected, the "Playback" panel will update to show the details of the selected video file, including its name, duration, and a thumbnail preview if available.
The "Playback" panel also provides controls for managing the playback of the selected video.

Controlling Video Playback
Once you have selected a video from the list, you can control its playback using the Start, Pause, and Stop buttons located in the "Playback" panel.
Start Button: Press this button to begin playing the selected video. The video will start from the beginning, and the playback progress will be displayed in the progress bar.
Pause Button: Press this button to pause the video playback at th
current position. The playback can be resumed from the same position by pressing the Start button again.
Resume Functionality: When the video is paused, pressing the Start button will resume playback from the paused position, allowing you to continue watching without restarting the video.
Stop Button: Press this button to stop the video playback completely. The video will reset to the beginning, and the progress bar will be cleared.
The playback controls provide a seamless way to manage the viewing experience, enabling you to start, pause, resume, or stop the video as needed.
These controls are essential for reviewing recorded video segments, allowing you to analyze specific parts of the video with precision